Category:Function moduls, Function decoders
Function Modules
General
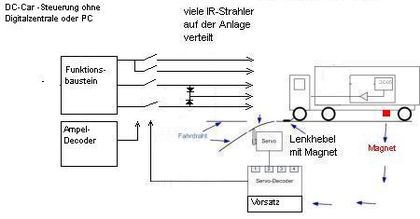
A function module transmits commands to a DC-Car decoder by means of a short range IR communication (10-20cm).
There are always 8 outputs available.
By using a dip switch 10 different module types are available
Supply voltage can be 12V - 16V AC or 12 - 16V DC
The outputs offer a current of 1A
By using a diode-circuit with 1N400x diodes it is possible to transmit multiple commands on one IR LED.
Stop module (All switches ON)
All switches ON Stop module means all 8 outputs sending a stop signal
Function Module A
Basic Commands
Dipswitch 1 must be set ON
1 = Speed at speed step 0 (stop)
2 = headlights 1 ON
3 = headlights 1 OFF
4 = Left indicator ON
5 = Right indicator ON
6 = Indicators OFF
7 = Speed at speed step 14
8 = Speed at speed step 28
Function Module B
Flashing Blue light vehicles
Dipswitch 2 must be set ON
1 = Speed at speed step 0 (stop)
2 = Hazard lights on
3 = Hazard kights OFF
4 = Flashing blue-light ON
5 = Flashing blue-light OFF
6 = Front-flasher ON
7 = Front-flasher OFF
8 = Speed at speed step 28
Function Module C
Additional lights and speed
Dipswitch 3 must be set ON
1 = Light 2 ON
2 = Light 2 OFF
3 = Light 3 ON
4 = Light 3 OFF
5 = Speed + 2 steps (accelerate)
6 = Speed - 2 steps (slowdown)
7 = Speed at speed step 10
8 = Speed at speed step 21
Function Module D
Automatic parking
Dip switch 4 must be set ON
(Stop time adjustable with CV108)
1 = Stop without direction indicators
2 = Stop with direction indicators on the left
3 = Stop with direction indicators on the right
4 = Stop with hazard lights
Drive off with driving position as specified in CV110 (flashing time adjustable with CV109)
5 = Driving / accelerating without direction indicators
6 = Drive / accelerate with direction indicators on the left
7 = Drive / accelerate with direction indicators on the right
8 = Driving / accelerating with hazard lights
Function Module E
Bus automatic
Dip switch 5 must be set ON
Commands E2 - E7 are only executed by vehicles that have been configured as vehicle types 13, 14 or 15 in CV100!
1 = Speed at speed step 0 (Stop)
2 = Bus stop, direction indicators OFF, interior lighting OFF
3 = Bus stop, direction indicators OFF, interior lighting ON
4 = Bus stop, direction indicators right, interior lighting ON
5 = Bus stop, alarm light ON, interior lighting ON
(Flashing time adjustable in CV106)
6 = Bus leaves with speed step as set in CV105 and direction indicators left
7 = Arrival at the bus stop with speed step as set in CV102 and direction indicators right (flashing time adjustable in CV101)
8 = Speed at speed step 0 (Stop)
Function Module F
Technic
Dip switch 6 on ON
1 = Switch OFF sensors front (FTR)
2 = Switch ON sensors front (FTR)
3 = Switch OFF reed contact
4 = Switch ON reed contact
5 = Switch OFF the light sensor
6 = Switch ON the light sensor
7 = Switch OFF rear IR LEDs
8 = Switch ON rear IR LEDs
Function Module G
Functions for emergency vehicles
Dip switch 7 must be set ON
1 = Speed at speed step 0 (Stop)
2 = Rotating beacons and front flashers ON
3 = Rotating beacons and front flashers OFF
4 = Direction indicators left ON
5 = Direction indicators right ON
6 = Direction indicators OFF
7 = Speed in speed step 14
8 = Speed in speed step 28
Function Module H
Standard mix
Dipswitch 8 must be set ON
1 = Speed at speed step 0 (Stop)
2 = Light 1, direction indicators, flashing lights and front flasher OFF
3 = Light 1 ON
4 = Direction indicators left ON
5 = Direction indicators right ON
6 = Rotating beacons and front flashers ON
7 = Speed at speed step 14
8 = Speed at speed step 28
Function Module I
Remote control
All switches must be set OFF
D1 Time-controlled stop (programmed via CV108) blinker OFF
D5 Run-up after stop (time is out) with drive position from CV110 (z.B. 1) direction indicator OFF
C5 Speed +2 (accelerate CV 98)
H2 All lights OFF
A4 Direction indicator left (with CV27=64 direction indicator right + left (same time) = hazard lights possible)
A5 Direction indicator right (with CV27=64 direction indicator right + left (same time) = hazard lights possible)
A2 Head light 1 (with CV60 light 1, 2, 3 and 4 at the same time possible)
H6 Beacon lights and front flashers with siren (alternative: switch to continuous light for another two lights)
Function Module J
MF3, MF4 and MF5 functions(from 8.2016)
Dip switch 1 + 2 must be set ON
1 = Multi-function output (MF3) ON
2 = Multi-function output (MF3) OFF
3 = Multi-function output (MF4) ON
4 = Multi-function output (MF4) OFF
5 = Multi-function output (MF5) ON
6 = Multi-function output (MF5) OFF
7 = Speed at speed step 0 (Stop)
8 = Speed at speed step 0 (Stop)
IR-LED on/in the street
Mounting of the IR-LED on the site:
The IR-LED is placed in or nearby the street in such a way that the cars can "see" the IR-light, emitted by the LED and execute the transmitted function at the intended place.
The IR-LED must be adjusted in a way, that the approaching vehicles can "see" it. On a straight line the vehicles detect the desired function in a distance of approx. 5 - 15cm from the LED
Sometimes a IR-LED influences the traffic on a parallel line too. In this case you can either increase the series resistor to decrease the range of the IR-signal or mount the LED into the street in a way that its IR beam lights vertical only.
If you do the second, please use LED with a wider angle of reflection.
Distance of the LEDs shoul be 5 - 10cm, but it is highly recommended to test it in every single case!
When the car passes the first LED it will start slowing down - an when it reaches the second LED in most cases it is that slow,
that it can come to a stop right there.
Using cars with a significiant lag it can be neccessary to use more LEDs
The LEDs are connected to the same connector, each ussing its own series resistor.
Mobile Transmitter SW
Using a more complex circuit, more commands of the SW function module are usable.
For complexity and error rate are to high for self-construction, our mobile transmitters are produced in series
Actually tthe first upgrades are available:
- charge connector is designed for 11 - 13V
on the other hand the charge connector delivers low voltage/current so it can be used for testing LED
- this connector can be extended for use as a continuity tester
LED test function is still available using this feature but another LED shows continuity
- solder a phototransistor to a plug and plug this into the jack
when the phototransistor is lighted, the LED of the continuity tester will glow
So you can check the IR-signals of the DC-Car System anytime
- possible extensions
with a built-in DC06 decoder, all signals could be shown by indicator lamps/LED
this wouuld enable you to check if in fact, a mixed signal is transmitted or a single signal only
this would make the mobile transmitter to a unversal tool for the DC-Car System
Function Decoder
Using the function module in DCC mode with a digital central
A function module can be extended with a digital input
After extension with a digital input the finction module becomes a function decoder
This enables switching the 8 outputs from a digital central using the addresses 1-8 (9-15)
Gerade in der Kombination mit anderen Funktionen macht das Schalten des Lichtausgang Sinn.
The decoder can be usd the same way as the module but offers switching by using 8 sequenced adresses
- central switching of "stop" for emergency OFF
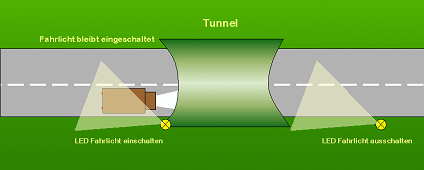
- central switching of light for day-/night mode
Blinkers are controlled by feedback sensors of junctions, lights are controlled by a digrital address
day/night control with a function decoder
Tag / Nachtsteuerung mit einem Funktionsdecoder.
other functions still can be controlled by switches
Subcategories
This category has the following 4 subcategories, out of 4 total.
Pages in category "Function moduls, Function decoders"
The following 16 pages are in this category, out of 16 total.
BDF |
F cont.I
S |
S cont.T |

