Difference between revisions of "Inputprint"
m |
m |
||
| Line 26: | Line 26: | ||
<br> | <br> | ||
| − | |||
===Controlled Servodecoders S4 and S8=== | ===Controlled Servodecoders S4 and S8=== | ||
[[File:S_Vorsatz_Bestueckung_neu.png|400px]]<br> | [[File:S_Vorsatz_Bestueckung_neu.png|400px]]<br> | ||
| Line 33: | Line 32: | ||
[[File:S_Vorsatz_W4.png|400px]]<br> | [[File:S_Vorsatz_W4.png|400px]]<br> | ||
| − | ===Controlled | + | ===Controlled Traffic_signal_decoder=== |
[[File:Schaltervorsatz_Ampel.png|400px]]<br> | [[File:Schaltervorsatz_Ampel.png|400px]]<br> | ||
<table Border="1"> | <table Border="1"> | ||
| Line 47: | Line 46: | ||
</table> | </table> | ||
<br><br><br><br><br> | <br><br><br><br><br> | ||
| − | + | <br> | |
| − | == | + | ==Instruktions== |
siehe [[Kit contruction inputprint]] | siehe [[Kit contruction inputprint]] | ||
| − | [[Servodecoder]] [[ | + | [[Servodecoder]] [[Traffic_signal_decoder]]<br> |
==Ation== | ==Ation== | ||
Hallsensors and R-Sensoren need a +5V connetion.<br> | Hallsensors and R-Sensoren need a +5V connetion.<br> | ||
| Line 58: | Line 57: | ||
<table border=1> | <table border=1> | ||
<tr><td> | <tr><td> | ||
| − | S8DCC/MOT | + | S8DCC/MOT up 01-02-2009 </td><td> </td><td>W4DCC/MOT up 26-04-2009</td></tr> |
<tr><td> | <tr><td> | ||
| − | S4DCC/MOT | + | S4DCC/MOT up 10-21-2008 </td><td> </td><td>Traffic_signal_decoder up 10-2010</td></tr> |
</table> | </table> | ||
| − | 1. [[File:S8-W4.png|180px| | + | 1. [[File:S8-W4.png|180px|S8-W4.png]] 2. [[File:Master_Bruecke.png|180px|Master_Bruecke.jpg]]<br> |
<br> | <br> | ||
<br> | <br> | ||
Revision as of 00:02, 28 October 2017
Contents
Print this site
Switchboard for Servo- und traffic light decoder
The servo decoder from DC-Car (MoBa-Claus) can also be operated with a PC via the RS232 port.
Besides the progamm for the servo decoder, the CD also includes a program for operating the servos by mouse or keyboard.
With self-written programs it is feasible to implement some time-automatic sequences.
As another option for connecting to this interface is the so called switchboard.
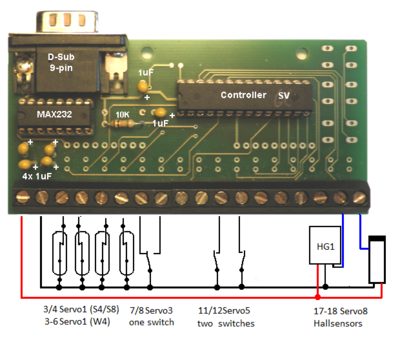
The Prozessor get the signals from switch, reedswitch, Hallsensors or IR-Sensoren from (MINUS) and take it over RS232-chip to the connetion from the Servodecoder.
The positions off the servos are controlled with the programmer over the PC.
Controlled Servodecoders S4 and S8
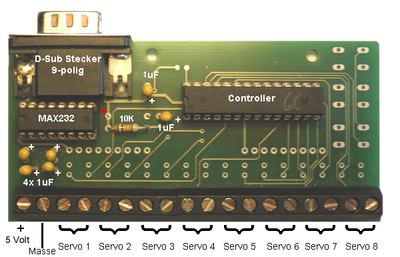
Controlled Servodecoder W4
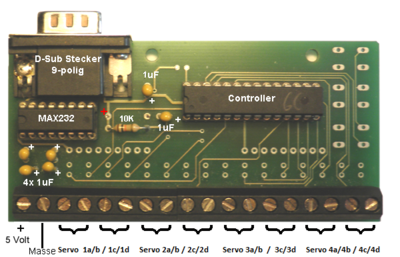
Controlled Traffic_signal_decoder
| 1 | 2 | 3-10 | 11+12 | 13 | 14 | 15 | 16 | 17 | 18 |
| + 5 V Out | - Ground | Trafficlight A - D | Call Light | Night | Nothalt | Start B | Start A | auto, off | auto. off |
| green red |
Instruktions
siehe Kit contruction inputprint
Servodecoder Traffic_signal_decoder
Ation
Hallsensors and R-Sensoren need a +5V connetion.
The left connector is 5V
use the servodecoder: with Extanionsconnector
| S8DCC/MOT up 01-02-2009 | W4DCC/MOT up 26-04-2009 | |
| S4DCC/MOT up 10-21-2008 | Traffic_signal_decoder up 10-2010 |
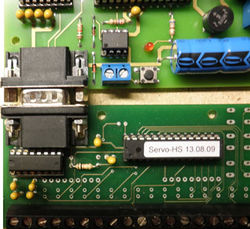
One screw is removed from the plug and the socket.<br
Then the assemblies can be plugged together and the ground connection is still given
If the switch is installed in a switchboard for the pushbuttons, a standard RS232 extension cable can be used
many servos with one switch
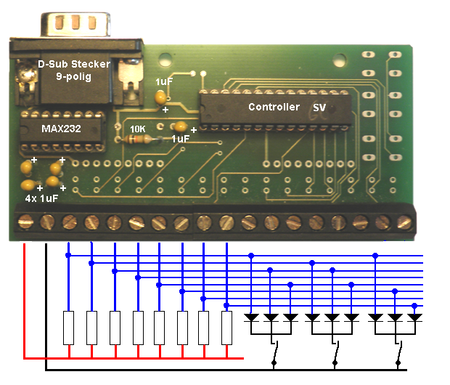
One switch can be used to operate several points simultaneously
The resistances should be 4.7 K and the diodes should be 1N4148
A control unit can be equipped with an RS232 cable (9-pin sub-D extension)
remote from the servo decoder.
