Difference between revisions of "CV-Programmer"
m |
(→Connecting the decoder) |
||
| (30 intermediate revisions by 2 users not shown) | |||
| Line 1: | Line 1: | ||
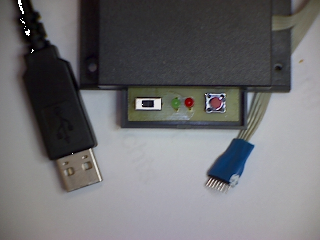
| − | [[ | + | [[File:CV-Prog.png|340px|thumb|right|ready-to-use programming device with USB-A connector, <br> power switch, LED USB / LED vehicle voltage, push-button, programming plug 1x8 pin <br> Adapter from 1x8 to 2x4 can be ordered as accessory]] |
| − | = | + | = Programmer = |
| − | '''CV-Programmer Hardware''' (Converter | + | '''CV-Programmer Hardware''' (Converter for reading and changing the CVs) |
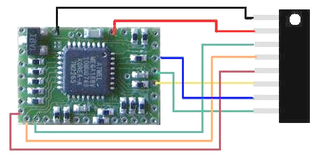
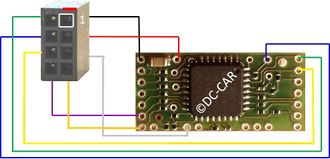
| − | + | The decoder in the model must have an 8 pin update socket. <br> | |
| − | + | ||
| − | + | ||
| − | + | ||
<br> | <br> | ||
| − | | + | [[File:Updatebuchse_8pol7.png|320px]] |
| + | [[File:Updatebuchse_4x2_dc08_2_8.jpg|Updatebuchse_4x2.png|330px]] | ||
<br> | <br> | ||
| + | '''Black, Red, Gray, Orange, Purple, Silver, Blue, Green''' | ||
<br> | <br> | ||
| − | |||
| − | |||
<br> | <br> | ||
| − | + | That applies to DC04, DC05, DC07 and DC08. <br> | |
| − | + | The DC06 can not be programmed by default because you have to solder a wire to SerOut on the processor. (directly on the chip) <br> | |
<br> | <br> | ||
| + | The DC-Car-XT module is equipped with the update socket on the left. <br> | ||
| + | The basic operation is like a vehicle decoder <br> | ||
<br> | <br> | ||
<br> | <br> | ||
| − | |||
| − | |||
| − | |||
| − | |||
| − | |||
| − | |||
| − | |||
| − | |||
| − | |||
| − | |||
| − | |||
<br> | <br> | ||
| − | + | ||
| − | + | =Installing CV-Programmer-Software= | |
| − | + | == Install USB driver == | |
| − | + | The supplied CV-Programmer is equipped with an FDTI-Chip-Set. This requires the correct '''[[Download # USB driver | Driver]]''' will be installed to match the operating system. <br> | |
| − | + | In the DC Car WIKI under [[Category:Download#USB-Driver | download]] select: WIN XP - WIN 7, or WIN 8 <br> | |
| − | == | + | Perform the setup before plugging in the device. <br> |
| − | + | In the Control Panel, the new COM port can be viewed and changed. <br> | |
| − | + | The COM port can not be higher than 16. <br> | |
| − | + | After multiple installation, com ports are reported as busy. You can try to overwrite them anyway to use a port under 16. By repeatedly changing to a different port number, incorrectly assigned ports are freely reported again. <br> | |
| + | |||
| + | == Set up CV Programmer Software == | ||
| + | From the DC-CAR WIKI under '''[[Download]]''' always the newest file e.g. Download [[Download | DC-CAR_CV_578L]] or newer (test version 579M). <br> | ||
| + | For the first installation the complete '''Setup''' is necessary. For an update, the exchange of files enough. see [[Trial Version]] <br> | ||
<br> | <br> | ||
| − | + | Plug in the USB cable and use the '''Find''' to check the possible COM port. <br> | |
| − | + | This must be between COM1 and COM 16. <br> | |
| + | Eventually use the Control Panel / Device Manager to detect and remember the COM port of FTDI (manufacturer). <br> | ||
| + | '' !!! Please be sure !!! !!! | ||
| + | The program only works with a connected decoder. <br> | ||
| + | === Download === | ||
| + | For DC07 or DC08 the CV-Programmer software 580 is required from 2017: <br> | ||
| + | For DC07 or DC08 with the December 2018 update, the CV-Programmer 580-V02 or higher is required <br> | ||
| + | current version: '''[[: Category: Download]]''' <br> | ||
<br> | <br> | ||
| − | + | Please save the saved settings first. (CV lists) <br> | |
| − | + | Then uninstall old version to install the new version without errors. <br> | |
| − | + | ||
| − | + | ||
| − | + | ||
| − | + | ||
| − | + | ||
| − | + | ||
<br> | <br> | ||
| − | ''' | + | |
| − | + | == Connecting the decoder == | |
| − | + | '''Important, the connection of the update socket on the vehicle:''' <br> | |
| − | + | PIN 1 minus (black) <br> | |
| + | PIN 2 + 4 volts (red) <br> | ||
| + | PIN 7 serial output (blue) <br> | ||
| + | PIN 8 serial input (green) <br> | ||
| + | [[Small_8-pole_update_socket | DC04 / DC05 / DC07 / DC10 small update socket]] <br> | ||
| + | [[Large_8-pole_update_socket | DC04 / DC05 / DC07 / DC10 large update socket]] <br> | ||
<br> | <br> | ||
| − | + | '''Special case''' | |
| − | ''' | + | Trailer connect without cabel over serial ouput to the trailerdecoder serial input. <br> |
| − | + | ||
| − | + | ||
<br> | <br> | ||
| − | + | The feedback connection MF5 (for [[DC-Car-XT]]) is not meant for this. <br> | |
| − | + | ||
<br> | <br> | ||
| − | + | ||
| − | + | == User manual == | |
| − | ''' | + | '''WARNING: If a [[LCIR | Remote receiver]] is connected to the decoder, it must not receive any signal from a DCC booster or PC transmitter during the entire procedure, as otherwise communication problems or malfunction will occur! '''<br> |
| + | For this you can cover the receiver with cardboard or plastic. <br> | ||
| + | (Do not use glossy (aluminum) sheet.) <br> | ||
<br> | <br> | ||
| − | + | Before and during switching on, the button must be pressed. When the headlights are flashing, release the button. <br> | |
| + | The headlights continue to flash and the decoder is in CV programming mode. <br> | ||
<br> | <br> | ||
| − | + | First the CV's have to be read from the decoder. <br> | |
| + | To do this you need to press below: <br> | ||
| + | '''Read all CV's from the decoder''' <br> | ||
<br> | <br> | ||
| − | + | Thus, the program automatically sets itself to the decoder type and the firmware version. <br> | |
| − | + | ||
| − | + | ||
| − | + | ||
| − | + | ||
<br> | <br> | ||
| − | + | Now a CV can be selected. After clicking the explanation appears on the right . <br> | |
| − | + | <br> | |
| + | At the top, the '''CV''' appear in the window. Next to it the '''current value''' is displayed. <br> | ||
| + | This can be changed by typing in or by clicking the '''actual values''' | ||
| + | The new value is highlighted. Then this must be confirmed above. | ||
| + | To transfer to the decoder, press the button below: <br> | ||
| + | '''Save CV xx to the vehicle''' <br> | ||
| + | <br> | ||
| + | The list is then re-imported from the vehicle. <br> | ||
| + | To avoid operator error, restart the program for setting another vehicle. <br> | ||
| − | ==CV- | + | == [[CV-List]] == |
| − | + | To find the right CV faster, the '''[[: Category: Download # CV-List_DC07_and_DC08 | CV-List]]''' is helpful. <br> | |
| − | + | This summarizes all adjustment possibilities. <br> | |
<br> | <br> | ||
| − | + | With the '''Search''' in the WIKI the term / CV can be searched for and the explanation can be found. <br> | |
| − | + | Individual examples are also explained here: '''[[:Category:CVlist|CVlist]]''' <br> | |
| + | |||
| + | === Download === | ||
| + | Download '''[[: Category: Download # Programmer | Programmer]]''', '''[[: Category: Download # Driver | Driver]]''' and '''[[: Category: Download # CV-Lists_DC07_and_DC08 | CV-List]] '''Complete CV-List as PDF to print. <br> | ||
| − | + | The list is then re-imported from the vehicle. <br> | |
| − | + | To avoid operator error, restart the program for setting another vehicle. <br> | |
| − | == | + | == Problems with old decoders == |
| − | + | see also here: '''[[CV-programmer_error]]''' | |
<hr> | <hr> | ||
| Line 99: | Line 106: | ||
<br> | <br> | ||
| − | + | It is not possible with older vehicle decoders to adjust the speed directly. <br> | |
| − | '''CV2 | + | '''CV2 minimum speed''' <br> |
| − | '''CV5 | + | '''CV5 top speed''' <br> |
<br> | <br> | ||
| − | + | Nevertheless, from May 2011, the CV2 and CV5 are adjustable. <br> | |
| − | + | Refer to Speed setting in [[CV-Programmer Operation]]. | |
<br> | <br> | ||
| − | + | Save '''File''' saves the values under '''own name'''. <br> | |
| − | + | e.g. as address 38.dcr or name firebrigade.dcr <br> | |
<br> | <br> | ||
| − | + | They can be reloaded if needed. <br> | |
| − | ''' | + | '''Current List save into the Decoder''' transfers the changed values to the decoder. <br> |
<br> | <br> | ||
| − | + | Please note: <br> | |
| − | + | Old stored data can not simply be transferred to a newer decoder type! <br> | |
| − | + | Otherwise there are some important values missing and it will cause a misconduct. <br> | |
<br> | <br> | ||
| − | + | There is a comparison program for this in the new software. <br> | |
| − | So | + | So you can determine the differences and note or print the relevant values. |
<br> | <br> | ||
| − | + | After reading, date and serial numbers can be found in the last lines. <br> | |
| − | + | From 578C, this data can be seen immediately above, | |
| − | + | we need this data for the service. | |
<br> | <br> | ||
| − | === | + | === Speed selection === |
| − | + | see [[CV_overview_grouped_by_function]] | |
<hr> | <hr> | ||
| − | |||
[[Category:Errorlist]] | [[Category:Errorlist]] | ||
| − | [[Category: | + | [[Category:Index_US]] |
| + | [[Category:Index_UK]] | ||
[[Category:Download]] | [[Category:Download]] | ||
[[Category:Update]] | [[Category:Update]] | ||
[[Category:Version]] | [[Category:Version]] | ||
[[Category:CV-Programmierung]] | [[Category:CV-Programmierung]] | ||
| − | [[Category: | + | [[Category:CVlist]] |
Latest revision as of 20:10, 3 September 2023
Contents
Programmer
CV-Programmer Hardware (Converter for reading and changing the CVs)
The decoder in the model must have an 8 pin update socket.


Black, Red, Gray, Orange, Purple, Silver, Blue, Green
That applies to DC04, DC05, DC07 and DC08.
The DC06 can not be programmed by default because you have to solder a wire to SerOut on the processor. (directly on the chip)
The DC-Car-XT module is equipped with the update socket on the left.
The basic operation is like a vehicle decoder
Installing CV-Programmer-Software
Install USB driver
The supplied CV-Programmer is equipped with an FDTI-Chip-Set. This requires the correct Driver will be installed to match the operating system.
In the DC Car WIKI under select: WIN XP - WIN 7, or WIN 8
Perform the setup before plugging in the device.
In the Control Panel, the new COM port can be viewed and changed.
The COM port can not be higher than 16.
After multiple installation, com ports are reported as busy. You can try to overwrite them anyway to use a port under 16. By repeatedly changing to a different port number, incorrectly assigned ports are freely reported again.
Set up CV Programmer Software
From the DC-CAR WIKI under Download always the newest file e.g. Download DC-CAR_CV_578L or newer (test version 579M).
For the first installation the complete Setup is necessary. For an update, the exchange of files enough. see Trial Version
Plug in the USB cable and use the Find to check the possible COM port.
This must be between COM1 and COM 16.
Eventually use the Control Panel / Device Manager to detect and remember the COM port of FTDI (manufacturer).
!!! Please be sure !!! !!!
The program only works with a connected decoder.
Download
For DC07 or DC08 the CV-Programmer software 580 is required from 2017:
For DC07 or DC08 with the December 2018 update, the CV-Programmer 580-V02 or higher is required
current version: Category: Download
Please save the saved settings first. (CV lists)
Then uninstall old version to install the new version without errors.
Connecting the decoder
Important, the connection of the update socket on the vehicle:
PIN 1 minus (black)
PIN 2 + 4 volts (red)
PIN 7 serial output (blue)
PIN 8 serial input (green)
DC04 / DC05 / DC07 / DC10 small update socket
DC04 / DC05 / DC07 / DC10 large update socket
Special case
Trailer connect without cabel over serial ouput to the trailerdecoder serial input.
The feedback connection MF5 (for DC-Car-XT) is not meant for this.
User manual
WARNING: If a Remote receiver is connected to the decoder, it must not receive any signal from a DCC booster or PC transmitter during the entire procedure, as otherwise communication problems or malfunction will occur!
For this you can cover the receiver with cardboard or plastic.
(Do not use glossy (aluminum) sheet.)
Before and during switching on, the button must be pressed. When the headlights are flashing, release the button.
The headlights continue to flash and the decoder is in CV programming mode.
First the CV's have to be read from the decoder.
To do this you need to press below:
Read all CV's from the decoder
Thus, the program automatically sets itself to the decoder type and the firmware version.
Now a CV can be selected. After clicking the explanation appears on the right .
At the top, the CV appear in the window. Next to it the current value is displayed.
This can be changed by typing in or by clicking the actual values
The new value is highlighted. Then this must be confirmed above.
To transfer to the decoder, press the button below:
Save CV xx to the vehicle
The list is then re-imported from the vehicle.
To avoid operator error, restart the program for setting another vehicle.
CV-List
To find the right CV faster, the CV-List is helpful.
This summarizes all adjustment possibilities.
With the Search in the WIKI the term / CV can be searched for and the explanation can be found.
Individual examples are also explained here: CVlist
Download
Download Programmer, Driver and CV-List Complete CV-List as PDF to print.
The list is then re-imported from the vehicle.
To avoid operator error, restart the program for setting another vehicle.
Problems with old decoders
see also here: CV-programmer_error
It is not possible with older vehicle decoders to adjust the speed directly.
CV2 minimum speed
CV5 top speed
Nevertheless, from May 2011, the CV2 and CV5 are adjustable.
Refer to Speed setting in CV-Programmer Operation.
Save File saves the values under own name.
e.g. as address 38.dcr or name firebrigade.dcr
They can be reloaded if needed.
Current List save into the Decoder transfers the changed values to the decoder.
Please note:
Old stored data can not simply be transferred to a newer decoder type!
Otherwise there are some important values missing and it will cause a misconduct.
There is a comparison program for this in the new software.
So you can determine the differences and note or print the relevant values.
After reading, date and serial numbers can be found in the last lines.
From 578C, this data can be seen immediately above,
we need this data for the service.
Speed selection
see CV_overview_grouped_by_function
