Difference between revisions of "Category:Road construction"
m (Created page with '=Strassenbau= '''Es wird immer wieder nachgefragt, wie baue ich eine Strasse.''' Dazu gibt es verschiedene Methoden. Die mir bekannten möchte ich hier aufzeigen und auch auf d…') |
m |
||
| (5 intermediate revisions by the same user not shown) | |||
| Line 1: | Line 1: | ||
| − | = | + | =Road construction= |
| − | + | ==How to built a road ?== | |
| − | + | There are many solutions for this task.<br> | |
| − | + | I would like to show the well-known ones to me and also go into the differences.<br> | |
| − | + | ||
| − | + | ||
| − | + | ||
| − | + | ||
| − | + | ||
| − | + | ||
| − | + | ||
| − | + | ||
| − | + | Important is besides the construction of the road, the necessary radii in curves and crossroads.<br> | |
| − | + | ||
| − | + | ||
| − | + | Each type of car drives around a curve differently. This has to be taken into account at the planning of the road.<br> | |
| − | < | + | A bus requires due to his long wheelbase and the long porch much more place in the curves than e.g. a small car.<br> |
| + | An articulated lorry needs much more place than e.g. a truck on the inside of a curve. The same space is needed at a truck with trailer.<br> | ||
| + | To put all these specifications into effect in the road construction, it requires some compromises.<br> | ||
| + | A general measure table for the road width and the distance of the driving wire to each other will not lead to the desired success. <br> | ||
| + | Much space is needed because the road need very big radii. <br> | ||
| + | Roads with the same radii everywhere does not look good and does not correspond with the reality.<br> | ||
<br> | <br> | ||
| − | + | The "Faller" wire is mostly used for the steering of the vehicles.<br> | |
| − | + | Magnetic tapes are available too.<br> | |
| + | First lets talk about how to use the "Faller" wire.<br> | ||
<br> | <br> | ||
| − | + | ==Fundamentals of using the wire== | |
| + | ===Length compensation at different temperatures:=== | ||
<br> | <br> | ||
| − | + | Use the wire only in short pieces of at most 50 cm (20 inch).<br> | |
| − | + | Keep distance of 2 mm between the individual wire pieces.<br> | |
| + | Keep a distance of at least 5 mm at parallel wires.<br> | ||
<br> | <br> | ||
| − | + | Be careful if you use water based plaster. The wire may rust.<br> | |
| − | + | Therefore paint it with colour before plaster.<br> | |
| − | + | <br> | |
| + | Flush mount the wire within the road surface.<br> | ||
| + | If too much plaster is applied, the wire lies too deeply in the road.<br> | ||
| + | This can lead to loose contact in curves or at junctions.<br> | ||
| + | <br> | ||
| + | <br> | ||
| + | ===Pressing the wire in a soft surface=== | ||
| + | <br> | ||
| + | The road is built with a soft material. Balsa wood or styrofoam e.g. may be used<br> | ||
| + | With a sharp knife or something like that a nut is cutted in.<br> | ||
| + | The wire is layed in this nut and is fixed with glue.<br> | ||
| + | After the glue is dried the first test runs can be done.<br>.<br> | ||
| + | Advantage:<br> | ||
| + | The layout of the wire may easy be changed.<br>.<br> | ||
| + | Disadvantage:<br> | ||
| + | The surface of the road is very smooth.<br> | ||
| + | The wire is not equaly embedded. The cars may leave the road at corners or junctions.<br> | ||
| + | <br> | ||
| + | ===Fix the wire on top=== | ||
| + | <br> | ||
| + | Fix the wire on your layout with adhesive tape.<br> | ||
| + | The first test runs can be done immediately.<br> | ||
| + | Advantage:<br> | ||
| + | The layout of the wire may easy be changed.<br> | ||
| + | Disadvantage:<br> | ||
| + | The cars may not follow the wire in same way as they do on an imbedded wire.<br> | ||
| + | The steering slider may get nagged.<br> | ||
| + | The hight of the wire needs to be filled up with plaster, plywood, paperboard e.g.<br> | ||
| + | On a movable layout (modul) the plaster may peeling off.<br> | ||
| + | <br> | ||
| + | ===Milling a groove with a tool like Dremel=== | ||
| + | <br> | ||
| + | The groove is cut with the tool in the roadway. <br> | ||
| + | Usually an adapter is used to guarante an uniform depth of groove. <br> | ||
| + | From a free-milling I advise, since the groove is not uniform. <br> | ||
| + | The wire is fixed with glue or tape in the groove. <br> | ||
| + | After that a test ride should be done with all the vehicles. <br><br> | ||
| + | Advantage: <br> | ||
| + | The laying of the wire can be changed quickly. <br> | ||
| + | Low-cost tool. <br><br> | ||
| + | Disadvantage: <br> | ||
| + | Uneven depth and width of the groove. <br> | ||
| + | Can only be performed on flat roads, otherwise the depth is different. <br> | ||
<br> | <br> | ||
| − | |||
| − | |||
| − | |||
| − | |||
| − | |||
| − | |||
| − | |||
| − | |||
| − | |||
| − | |||
| − | |||
| − | |||
| − | |||
| − | |||
| − | |||
| − | |||
| − | |||
| − | |||
| − | |||
| − | |||
| − | |||
| − | |||
| − | |||
| − | |||
| − | |||
| − | |||
| − | |||
| − | |||
| − | |||
| − | |||
| − | |||
| − | |||
| − | |||
| − | |||
| − | |||
| − | |||
| − | |||
| − | |||
| − | |||
| − | |||
| − | == | + | ===Milling a groove with the Faller milling tool=== |
| − | + | <br> | |
| − | + | The groove is milled with the Faller tool into the roadway. <br> | |
| − | + | The wire is pressed into the groove. <br> | |
| − | + | Since the wire is stuck in the groove, a fixation is unnecessary. <br> | |
| − | + | To be safe, the wire can be additionally fixed with a thin adhesive tape (Tesa). <br> | |
| − | + | After that a test ride should be done with all the vehicles. <br><br> | |
| − | + | Advantage: <br> | |
| − | + | The laying of the wire can be changed quickly. <br> | |
| − | + | Uniform depth and width of the groove <br> | |
| − | + | The uniform depth of the vehicles driving safely in the curves <br> | |
| − | + | It requires very little filler. | |
| − | + | Can be done anywhere. Even in tight spaces and on slopes. <br><br> | |
| − | + | Disadvantage: <br> | |
| − | + | The price of the Faller tool. <br> | |
| − | + | <br> | |
| − | + | ||
| − | == | + | ==Magnetic tape== |
| + | <br> | ||
| + | There are 3 types of magnetic tapes available:<br> | ||
| + | <br> | ||
| + | 1. For vehicles like the Faller Car System (3 x 1 x 1000 mm)<br> | ||
| + | 2. For own cars without reed switch (3 x 3 x 200 mm)<br> | ||
| + | 3. For Mader Magnet Truck cars (6 x 3 x 200 mm)<br> | ||
| + | <br> | ||
| + | ====Magnetic tape for Faller-Car-System-cars==== | ||
| + | The tape is 1 mm thick and 3 mm wide and very flexible. <br> | ||
| + | It can be inserted into a machined groove or placed on top of the roadway. <br> | ||
| + | The tape provides a better guidance of the vehicles than the wire. <br> | ||
| + | It does not affect the reed switch <br> | ||
| + | A thin road surface up to 1 mm is possible <br> | ||
| + | The steering lever can be lifted up a small piece, therefore the lever is not dragging on the roadway <br> | ||
| + | The vehicles drive longer <br> | ||
| + | <br> | ||
| + | ==== Magnetic tape for Car System vehicles ==== | ||
| + | The magnetic strip is 3 mm thick and 3 mm wide and flexible. <br> | ||
| + | It can be inserted into a machined groove or laid under a thin road. <br> | ||
| + | The magnetic strip provides better management of vehicles than the wire. <br> | ||
| + | A road surface up to 2 mm is possible if the tape is laid out below the roadface. <br> | ||
| + | laid on the surface it can cause Faller Reed <br> | ||
| + | For Mader magnet truck the tape is too weak <br> | ||
| + | <br> | ||
| + | ==== Magnetic tape for Mader Magnet Truck ==== | ||
| + | The magnetic strip is 3 mm thick and 6 mm wide and flexible. <br> | ||
| + | It can be inserted into a machined groove or laid under the road. <br> | ||
| + | The magnetic strip provides better management of vehicles than the wire. <br> | ||
| + | A road surface up to 3 mm is possible if the tape is laid out below the roadface. <br> | ||
| + | For Mader-Magnet-Trucks it has to be laid at the surface so that the Mader-reed switch is activated. <br> | ||
| + | On such a road with no junctions and crossings Faller vehicles can not be used. <br> | ||
| + | Small cars get stuck on the road. <br> | ||
<br> | <br> | ||
| − | |||
| − | |||
| − | |||
| − | |||
| − | |||
| − | |||
| − | |||
| − | |||
| − | |||
| − | |||
| − | |||
| − | |||
| − | |||
| − | |||
| − | === | + | == How do I find the right radius and wire spacing == |
| − | + | ||
| − | + | ||
| − | + | ||
| − | + | ||
| − | + | ||
| − | + | ||
| − | + | ||
| − | + | ||
| − | + | ||
| − | + | ||
| − | + | ||
| − | + | ||
| − | + | ||
| − | + | ||
| − | + | ||
| − | + | ||
| − | + | ||
| − | + | ||
| − | + | ||
| − | + | ||
| − | + | ||
| − | + | ||
| − | + | ||
| − | + | ||
| − | + | ||
| − | + | ||
| − | + | ||
| − | + | ||
| − | + | ||
| − | + | ||
| − | + | ||
| − | + | ||
| − | + | ||
| − | + | ||
| − | + | ||
| − | + | ||
| − | + | ||
| − | + | ||
| − | + | ||
| − | + | ||
| − | + | ||
| − | + | ||
| − | + | ||
| − | + | ||
| − | + | ||
| − | + | ||
| − | + | ||
| − | + | ||
| − | + | ||
| − | + | ||
| − | + | ||
| − | + | ||
| − | + | ||
| − | + | ||
| − | + | ||
| − | + | ||
| − | + | ||
| − | + | ||
| − | + | ||
| − | + | ||
| − | + | ||
| − | + | ||
| − | + | ||
| − | + | ||
<br> | <br> | ||
| − | + | There is no general table! <br> | |
| − | 2. | + | A two-lane road in H0 should be at least 9cm wide. Better is 10 cm. <br> |
| − | + | [[file:2spurige_strasse.png]]<br> | |
| + | The wire distance from track to track is 5 cm for a 10 cm road. <br> | ||
| + | From the roadside is it 2.5 cm. <br> | ||
| + | In a curve, it looks different. I use the smallest radius of 12 cm. <br><br> | ||
| + | [[file:Kurve 1.png]]<br><br> | ||
| + | The curve radius is one of 12 cm used in either direction.<br> | ||
| + | This looks at first glance a little bit weird, but it creates space at the top of the curve, so that two vehicles can pass without collision.<br> | ||
| + | The black-drawn wires are not visible.<br> | ||
| + | If the wire is layed along the red line, oncoming vehicles may collide.<br> | ||
| + | This curve can be used for small vehicles, trucks and buses.<br> | ||
| + | For trucks with trailers or trucks the curve must be significantly expanded.<br> | ||
| − | + | The following pictures show how the different cars driving through a curve.<br> | |
| − | + | As an example, I have chosen the radii 10 cm and 7.5 cm. These radii do I use in villages.<br> | |
| − | + | ||
| − | + | ||
| − | + | ||
| − | + | ||
| − | + | ||
| − | + | '''The sprinter needs little more room in the curve than in the straight.'''<br><br> | |
| − | + | [[file:Fahrbahn Sprinter.jpg]]<br><br><br><br> | |
| − | + | '''The fire engine needed a bit more space than the Sprinter.'''<br><br> | |
| − | + | [[file:Fahrbahn Feuerwehr.jpg]]<br><br><br><br> | |
| − | + | '''The lorry needs the same space as the fire engine.'''<br><br> | |
| − | + | [[file:Fahrbahn LKW.jpg]]<br><br><br><br> | |
| − | + | '''The bus is very cumbersome because of its long wheelbase. The front deck has to be considered in road design'''<br> | |
| − | + | [[file:Fahrbahn Bus.jpg]]<br><br><br><br> | |
| + | '''The truck with a trailer needs more space than a bus'''<br><br> | ||
| + | [[file:Fahrbahn LKW Anhaenger.jpg]]<br><br><br><br> | ||
| + | '''The trailer truck needs the most space'''<br><br> | ||
| + | [[file:Fahrbahn Sattelzug.jpg]]<br><br><br><br> | ||
| + | The problem may be solved by the green line. <br> | ||
| + | In reality, driver of a tractor or a truck with a trailer use this line.<br> | ||
| + | A problem here is with the vehicles on the crossing area.<br> | ||
| + | The next image shows the solution by widening the lanes at intersections.<br><br> | ||
| + | [[file:Sattelzug erweiterte Fahrbahn.jpg]]<br><br><br><br> | ||
| + | How can a car use the green line? <br> | ||
| + | There are two possibilities: <br> | ||
| + | 1. Only for the long vehicles an additional wire is layed out. <br> | ||
| + | 2. It is built in a turnout that switches only by long vehicles. <br> | ||
| + | Only the long vehicles have magnet mounted, which switches via a reed-contact the turnout. <br> | ||
| + | If the vehicle has run over the turnout, it will be switched back again by a second contact.<br> | ||
| − | == | + | == Preparation, filling and coloring the street == |
| − | + | <br> | |
| − | + | Many tips are given within the various forums. <br> | |
| − | + | A general tip is: <br> | |
| − | + | Use as little filler as possible! <br> | |
| − | + | The thickness of the filler depends on how the wire was laid. <br> | |
| − | + | At least spatula is required when the wire is inserted into the milled groove. <br> | |
| − | + | For filling resin filler may be used. | |
| − | + | This creates a smooth surface that contributes to and is barely dry quickly. <br> | |
| − | + | Since this filler contain no water, the wire can not rust. <br> | |
| − | + | In addition, the filler acts as a glue, thus can fix the wire instead of using super glue.<br> | |
| − | + | All that is applied too thick on the contact wire can later lead to the breaking of the vehicles. <br> | |
| − | + | If the road is smoothed, it should be re-sanded until the wire is visible again. <br> | |
| − | + | When everything is dry, a test of the layout should be performed. <br> | |
| − | + | This is very important, because now it's still time to correct the wire. <br> | |
| − | + | Test with all the cars to see if everything works. <br> | |
| − | + | ||
| − | + | ||
| − | + | ||
| − | + | ||
| − | + | ||
| − | + | ||
| − | + | ||
| − | + | ||
| − | |||
| − | |||
| − | |||
| − | |||
| − | |||
| − | |||
| − | |||
| − | |||
| − | [[Category: | + | [[Category:Reseller]] |
| − | + | ||
[[Category:DC-Car-System]] | [[Category:DC-Car-System]] | ||
| − | [[Category: | + | [[Category:Servodecoders]] |
| + | [[Category:Index_UK]] | ||
| + | [[Category:Index_US]] | ||
Latest revision as of 19:03, 25 December 2017
Contents
Road construction
How to built a road ?
There are many solutions for this task.
I would like to show the well-known ones to me and also go into the differences.
Important is besides the construction of the road, the necessary radii in curves and crossroads.
Each type of car drives around a curve differently. This has to be taken into account at the planning of the road.
A bus requires due to his long wheelbase and the long porch much more place in the curves than e.g. a small car.
An articulated lorry needs much more place than e.g. a truck on the inside of a curve. The same space is needed at a truck with trailer.
To put all these specifications into effect in the road construction, it requires some compromises.
A general measure table for the road width and the distance of the driving wire to each other will not lead to the desired success.
Much space is needed because the road need very big radii.
Roads with the same radii everywhere does not look good and does not correspond with the reality.
The "Faller" wire is mostly used for the steering of the vehicles.
Magnetic tapes are available too.
First lets talk about how to use the "Faller" wire.
Fundamentals of using the wire
Length compensation at different temperatures:
Use the wire only in short pieces of at most 50 cm (20 inch).
Keep distance of 2 mm between the individual wire pieces.
Keep a distance of at least 5 mm at parallel wires.
Be careful if you use water based plaster. The wire may rust.
Therefore paint it with colour before plaster.
Flush mount the wire within the road surface.
If too much plaster is applied, the wire lies too deeply in the road.
This can lead to loose contact in curves or at junctions.
Pressing the wire in a soft surface
The road is built with a soft material. Balsa wood or styrofoam e.g. may be used
With a sharp knife or something like that a nut is cutted in.
The wire is layed in this nut and is fixed with glue.
After the glue is dried the first test runs can be done.
.
Advantage:
The layout of the wire may easy be changed.
.
Disadvantage:
The surface of the road is very smooth.
The wire is not equaly embedded. The cars may leave the road at corners or junctions.
Fix the wire on top
Fix the wire on your layout with adhesive tape.
The first test runs can be done immediately.
Advantage:
The layout of the wire may easy be changed.
Disadvantage:
The cars may not follow the wire in same way as they do on an imbedded wire.
The steering slider may get nagged.
The hight of the wire needs to be filled up with plaster, plywood, paperboard e.g.
On a movable layout (modul) the plaster may peeling off.
Milling a groove with a tool like Dremel
The groove is cut with the tool in the roadway.
Usually an adapter is used to guarante an uniform depth of groove.
From a free-milling I advise, since the groove is not uniform.
The wire is fixed with glue or tape in the groove.
After that a test ride should be done with all the vehicles.
Advantage:
The laying of the wire can be changed quickly.
Low-cost tool.
Disadvantage:
Uneven depth and width of the groove.
Can only be performed on flat roads, otherwise the depth is different.
Milling a groove with the Faller milling tool
The groove is milled with the Faller tool into the roadway.
The wire is pressed into the groove.
Since the wire is stuck in the groove, a fixation is unnecessary.
To be safe, the wire can be additionally fixed with a thin adhesive tape (Tesa).
After that a test ride should be done with all the vehicles.
Advantage:
The laying of the wire can be changed quickly.
Uniform depth and width of the groove
The uniform depth of the vehicles driving safely in the curves
It requires very little filler.
Can be done anywhere. Even in tight spaces and on slopes.
Disadvantage:
The price of the Faller tool.
Magnetic tape
There are 3 types of magnetic tapes available:
1. For vehicles like the Faller Car System (3 x 1 x 1000 mm)
2. For own cars without reed switch (3 x 3 x 200 mm)
3. For Mader Magnet Truck cars (6 x 3 x 200 mm)
Magnetic tape for Faller-Car-System-cars
The tape is 1 mm thick and 3 mm wide and very flexible.
It can be inserted into a machined groove or placed on top of the roadway.
The tape provides a better guidance of the vehicles than the wire.
It does not affect the reed switch
A thin road surface up to 1 mm is possible
The steering lever can be lifted up a small piece, therefore the lever is not dragging on the roadway
The vehicles drive longer
Magnetic tape for Car System vehicles
The magnetic strip is 3 mm thick and 3 mm wide and flexible.
It can be inserted into a machined groove or laid under a thin road.
The magnetic strip provides better management of vehicles than the wire.
A road surface up to 2 mm is possible if the tape is laid out below the roadface.
laid on the surface it can cause Faller Reed
For Mader magnet truck the tape is too weak
Magnetic tape for Mader Magnet Truck
The magnetic strip is 3 mm thick and 6 mm wide and flexible.
It can be inserted into a machined groove or laid under the road.
The magnetic strip provides better management of vehicles than the wire.
A road surface up to 3 mm is possible if the tape is laid out below the roadface.
For Mader-Magnet-Trucks it has to be laid at the surface so that the Mader-reed switch is activated.
On such a road with no junctions and crossings Faller vehicles can not be used.
Small cars get stuck on the road.
How do I find the right radius and wire spacing
There is no general table!
A two-lane road in H0 should be at least 9cm wide. Better is 10 cm.
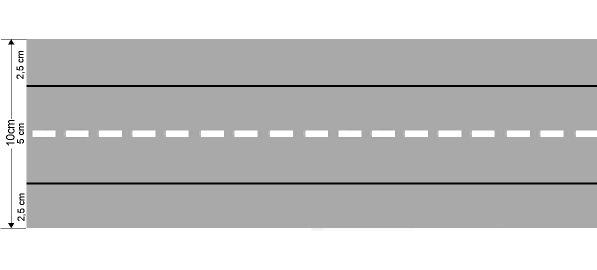
The wire distance from track to track is 5 cm for a 10 cm road.
From the roadside is it 2.5 cm.
In a curve, it looks different. I use the smallest radius of 12 cm.
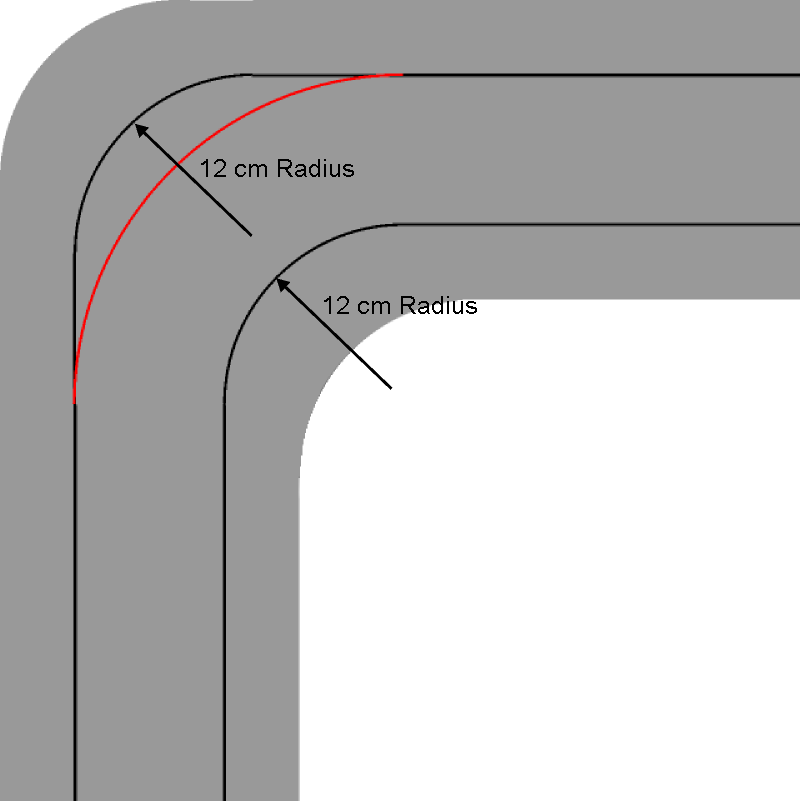
The curve radius is one of 12 cm used in either direction.
This looks at first glance a little bit weird, but it creates space at the top of the curve, so that two vehicles can pass without collision.
The black-drawn wires are not visible.
If the wire is layed along the red line, oncoming vehicles may collide.
This curve can be used for small vehicles, trucks and buses.
For trucks with trailers or trucks the curve must be significantly expanded.
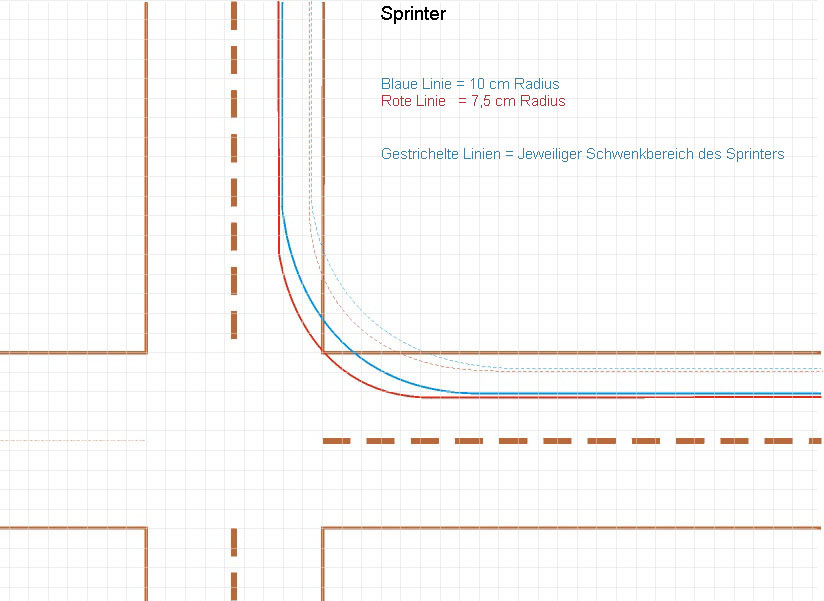
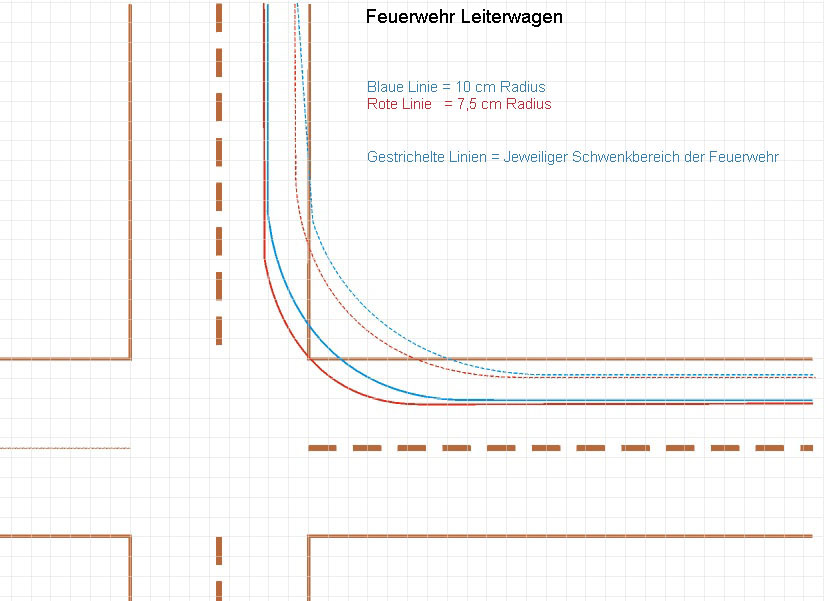
The following pictures show how the different cars driving through a curve.
As an example, I have chosen the radii 10 cm and 7.5 cm. These radii do I use in villages.
The sprinter needs little more room in the curve than in the straight.
The fire engine needed a bit more space than the Sprinter.
The lorry needs the same space as the fire engine.
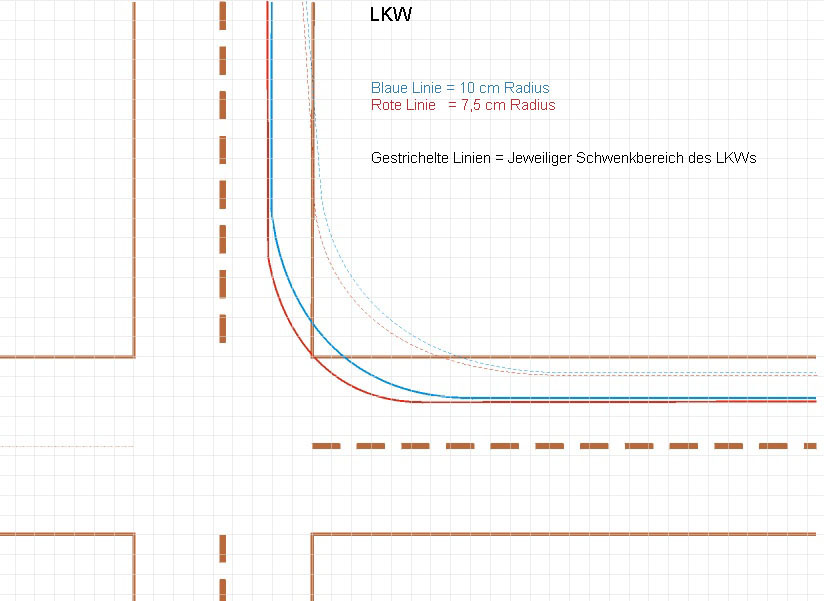
The bus is very cumbersome because of its long wheelbase. The front deck has to be considered in road design
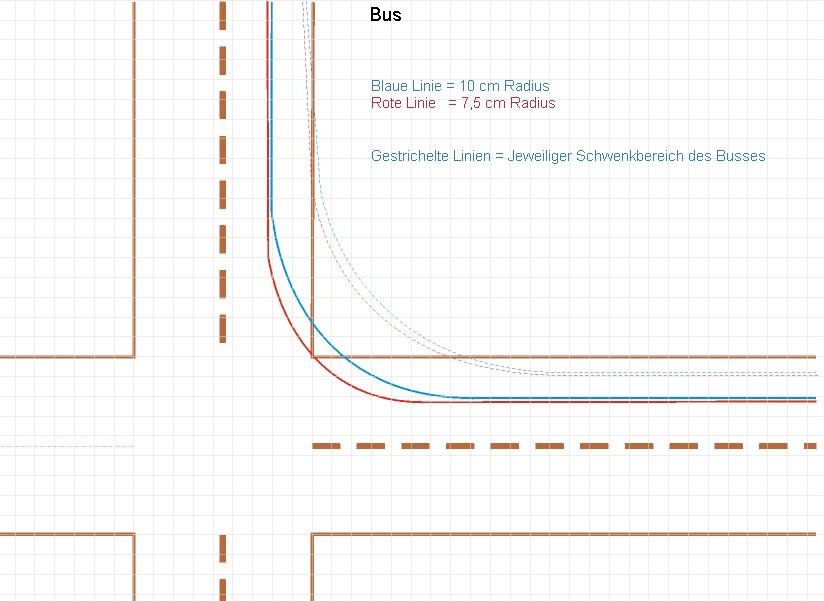
The truck with a trailer needs more space than a bus
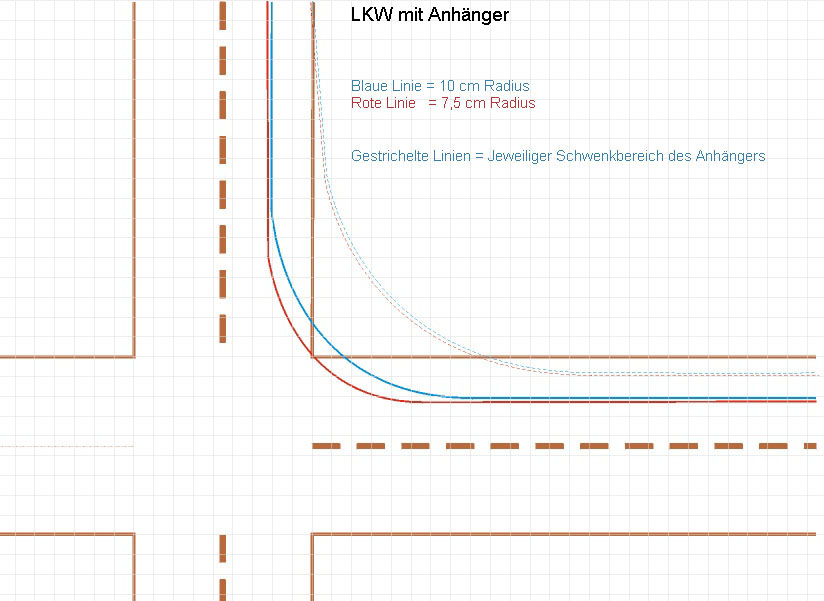
The trailer truck needs the most space
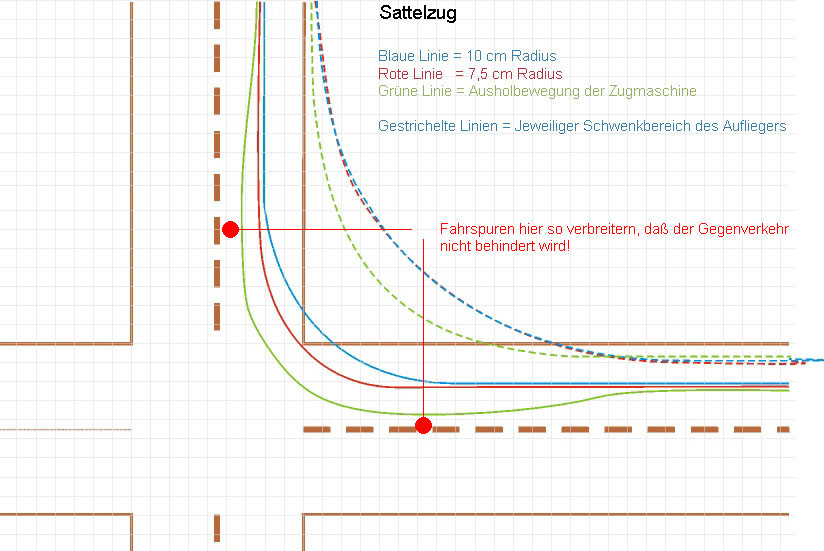
The problem may be solved by the green line.
In reality, driver of a tractor or a truck with a trailer use this line.
A problem here is with the vehicles on the crossing area.
The next image shows the solution by widening the lanes at intersections.
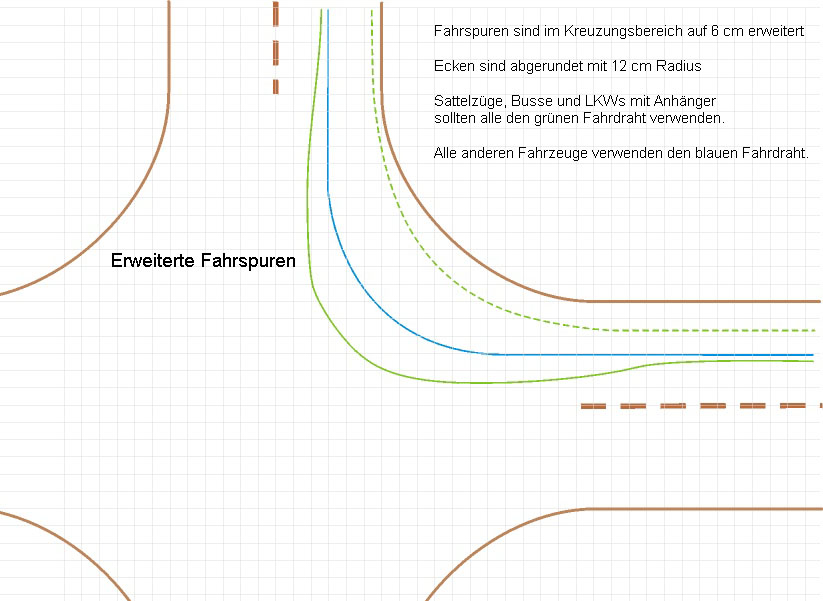
How can a car use the green line?
There are two possibilities:
1. Only for the long vehicles an additional wire is layed out.
2. It is built in a turnout that switches only by long vehicles.
Only the long vehicles have magnet mounted, which switches via a reed-contact the turnout.
If the vehicle has run over the turnout, it will be switched back again by a second contact.
Preparation, filling and coloring the street
Many tips are given within the various forums.
A general tip is:
Use as little filler as possible!
The thickness of the filler depends on how the wire was laid.
At least spatula is required when the wire is inserted into the milled groove.
For filling resin filler may be used.
This creates a smooth surface that contributes to and is barely dry quickly.
Since this filler contain no water, the wire can not rust.
In addition, the filler acts as a glue, thus can fix the wire instead of using super glue.
All that is applied too thick on the contact wire can later lead to the breaking of the vehicles.
If the road is smoothed, it should be re-sanded until the wire is visible again.
When everything is dry, a test of the layout should be performed.
This is very important, because now it's still time to correct the wire.
Test with all the cars to see if everything works.
This category currently contains no pages or media.