Category:Function moduls, Function decoders ES

From wiki-en
Jump to: navigation, search
Function modul
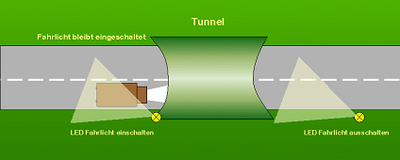
Light on / off

Function Modules

General

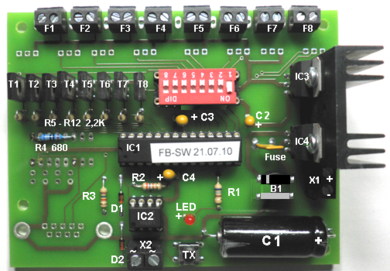
El módulo de funciones controla las funciones de un vehículo de DC Car, como luces o intermitentes, mediante LEDs IR, que se pueden colocar en el lateral de la carretera.

Este módulo de funciones tiene 8 salidas, cada una con un código diferente (función). Los 8 bloques de funciones (A-H) están preprogramados y mediante un interruptor dip se puede elegir sus funciones.

El módulo de funciones se entrega completamente montado e incluye 8 Emisores IR 3mm para distancia corta y 8 resistencias.


A function module transmits commands to a DC-Car decoder by means of a short range IR communication (10-20cm).
There are always 8 outputs available.
By using a dip switch 10 different module types are available
Supply voltage can be 12V - 16V AC or 12 - 16V DC
The outputs offer a current of 1A

By using a diode-circuit with 1N400x diodes it is possible to transmit multiple commands on one IR LED.

Stop module (All switches ON)

All switches ON Stop module means all 8 outputs sending a stop signal


Function Module A

Basic Commands
Dipswitch 1 must be set ON
1 = Speed at speed step 0 (stop)
2 = headlights 1 ON
3 = headlights 1 OFF
4 = Left indicator ON
5 = Right indicator ON
6 = Indicators OFF
7 = Speed at speed step 14
8 = Speed at speed step 28


Function Module B

Flashing Blue light vehicles
Dipswitch 2 must be set ON
1 = Speed at speed step 0 (stop)
2 = Hazard lights on
3 = Hazard kights OFF
4 = Flashing blue-light ON
5 = Flashing blue-light OFF
6 = Front-flasher ON
7 = Front-flasher OFF
8 = Speed at speed step 28

Function Module C

Additional lights and speed
Dipswitch 3 must be set ON

1 = Light 2 ON
2 = Light 2 OFF
3 = Light 3 ON
4 = Light 3 OFF
5 = Speed + 2 steps (accelerate)
6 = Speed - 2 steps (slowdown)
7 = Speed at speed step 10
8 = Speed at speed step 21


Function Module D

Automatic parking
Dip switch 4 must be set ON

(Stop time adjustable with CV108)
1 = Stop without direction indicators
2 = Stop with direction indicators on the left
3 = Stop with direction indicators on the right
4 = Stop with hazard lights
Drive off with driving position as specified in CV110 (flashing time adjustable with CV109)
5 = Driving / accelerating without direction indicators
6 = Drive / accelerate with direction indicators on the left
7 = Drive / accelerate with direction indicators on the right
8 = Driving / accelerating with hazard lights


Function Module E

Bus automatic
Dip switch 5 must be set ON

Commands E2 - E7 are only executed by vehicles that have
been configured as vehicle types 13, 14 or 15 in CV100!
1 = Speed at speed step 0 (Stop)
2 = Bus stop, direction indicators OFF, interior lighting OFF
3 = Bus stop, direction indicators OFF, interior lighting ON
4 = Bus stop, direction indicators right, interior lighting ON
5 = Bus stop, alarm light ON, interior lighting ON
(Flashing time adjustable in CV106)
6 = Bus leaves with speed step as set in CV105 and direction indicators left
7 = Arrival at the bus stop with speed step as set in CV102 and
direction indicators right (flashing time adjustable in CV101)
8 = Speed at speed step 0 (Stop)


Function Module F

Technic
Dip switch 6 on ON

1 = Switch OFF sensors front (FTR)
2 = Switch ON sensors front (FTR)
3 = Switch OFF reed contact
4 = Switch ON reed contact
5 = Switch OFF the light sensor
6 = Switch ON the light sensor
7 = Switch OFF rear IR LEDs
8 = Switch ON rear IR LEDs


Function Module G

Emergency vehicles
Dip switch 7 must be set ON

1 = Speed at speed step 0 (Stop)
2 = Rotating beacons and front flashers ON
3 = Rotating beacons and front flashers OFF
4 = Direction indicators left ON
5 = Direction indicators right ON
6 = Direction indicators OFF
7 = Speed in speed step 14
8 = Speed in speed step 28


Function Module H

Standard mix
Dipswitch 8 must be set ON

1 = Speed at speed step 0 (Stop)
2 = Light 1, direction indicators, flashing lights and front flasher OFF
3 = Light 1 ON
4 = Direction indicators left ON
5 = Direction indicators right ON
6 = Rotating beacons and front flashers ON
7 = Speed at speed step 14
8 = Speed at speed step 28


Function Module I

Remote control
All switches must be set OFF

D1 Time-controlled stop (programmed via CV108) blinker OFF
D5 Run-up after stop (time is out) with drive position from
  CV110 (z.B. 1) direction indicator OFF
C5 Speed +2 (accelerate CV 98)
H2 All lights OFF
A4 Direction indicator left (with CV27=64 direction indicator
  right + left (same time) = hazard lights possible)
A5 Direction indicator right (with CV27=64 direction
  indicator right + left (same time) = hazard lights possible)
A2 Head light 1 (with CV60 light 1, 2, 3 and 4 at the same time possible)
H6 Beacon lights and front flashers with siren
(alternative: switch to continuous light for another two lights)


Function Module J

MF3, MF4 and MF5 functions(from 8.2016)
Dip switch 1 + 2 must be set ON

1 = Multi-function output (MF3) ON
2 = Multi-function output (MF3) OFF
3 = Multi-function output (MF4) ON
4 = Multi-function output (MF4) OFF
5 = Multi-function output (MF5) ON
6 = Multi-function output (MF5) OFF
7 = Speed at speed step 0 (Stop)
8 = Speed at speed step 0 (Stop)


IR-LED on/in the street

Mounting of the IR-LED on the site:

The IR-LED is placed in or nearby the street in such a way that the cars can "see" the IR-light, emitted by the LED and execute the transmitted function at the intended place.
The IR-LED must be adjusted in a way, that the approaching vehicles can "see" it. On a straight line the vehicles detect the desired function in a distance of approx. 5 - 15cm from the LED
Sometimes a IR-LED influences the traffic on a parallel line too. In this case you can either increase the series resistor to decrease the range of the IR-signal or mount the LED into the street in a way that its IR beam lights vertical only. If you do the second, please use LED with a wider angle of reflection. Distance of the LEDs shoul be 5 - 10cm, but it is highly recommended to test it in every single case!

When the car passes the first LED it will start slowing down - an when it reaches the second LED in most cases it is that slow,
that it can come to a stop right there.
Using cars with a significiant lag it can be neccessary to use more LEDs

The LEDs are connected to the same connector, each ussing its own series resistor.


Remote control

To make it easy for you we produce a battery powered remote control: MF plus The Plus version has build in test functions which can be used with the optional test set.

Function Decoder

Using the function module in DCC mode with a digital central A function module can be extended with a digital input
After extension with a digital input the finction module becomes a function decoder
This enables switching the 8 outputs from a digital central using the addresses 1-8 (9-15)

Gerade in der Kombination mit anderen Funktionen macht das Schalten des Lichtausgang Sinn.

The decoder can be usd the same way as the module but offers switching by using 8 sequenced adresses


- central switching of "stop" for emergency OFF
- central switching of light for day-/night mode

Blinkers are controlled by feedback sensors of junctions, lights are controlled by a digrital address

day/night control with a function decoder
Tag / Nachtsteuerung mit einem Funktionsdecoder.
other functions still can be controlled by switches


Pages in category "Function moduls, Function decoders ES"

This category contains only the following page.